


Python Turtle Programming |
|

|
Python turtle library assists new developers with discovering what programming with Python resembles in a fun and intelligent manner. turtle is principally used to acquaint youngsters with the universe of PCs. It's a direct yet adaptable approach to comprehend the ideas of Python. |
Turtle is a pre-installed Python library that allows us programmers to create images and shapes in a digital canvas. The onscreen pen that we’ll be seeing often is called the turtle and this is what gave the library its name. Turtle programming is great for all beginners.
Choosing the right IDE for the Job

As most programing languages, we need a workspace to work on our programs. For our first turtle program, we’ll be using a built-in workspace provided to us by python “IDLE (Python 3.8 32-bit)”. If you don’t have this in your computer check out https://www.python.org/downloads/ to download python on your computer.
Once you’ve installed Python 3 in your Computer
Follow the steps below and let’s begin learning Python’s Turtle Library
Step 1
Click the windows button on your keyboard and type within the search bar “IDLE”
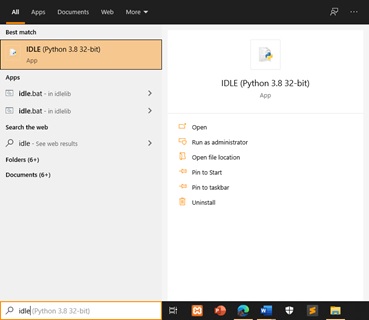
Step 2
Open the Python IDLE, the Python Shell should open up, here is where we will code.
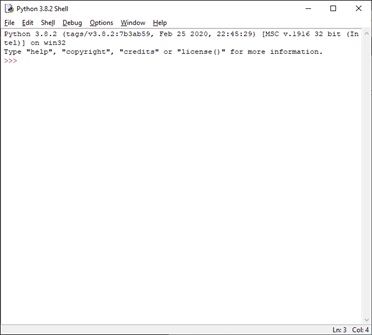
Step 3
Think of a good Turtle name for your Turtle then use “as” to name your Turtle.
Type within your Python Shell, import turtle as, then a unique name for your turtle
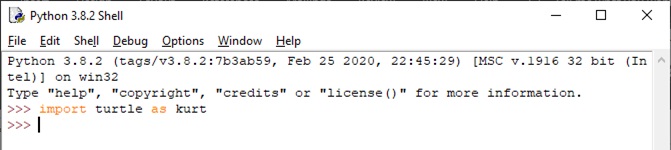
You can also use other names to name your turtle, like Sam, Nicole, mark, Ron. It should work the same as the default turtle but with us uniquely naming it.
Let's test out a sample code.
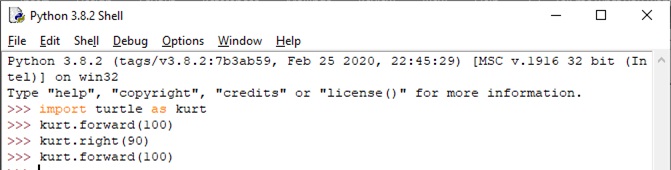
See, we were able to create a uniquely named turtle and allowed it to move. On the following lessons we’ll be teaching you more on Python’s Turtle, this is more of a sample on what you’ll be able to do with Python’s Turtle.
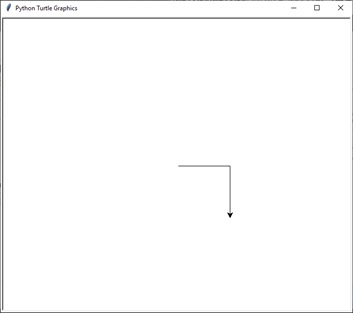
Step 1
Within the search bar of your computer type in “IDLE” and click the IDLE (Python 3.8 32-bit)

Step 2
Within the shell type “import turtle as“ then add the name of your turtle then press enter.
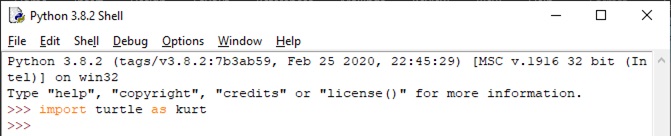
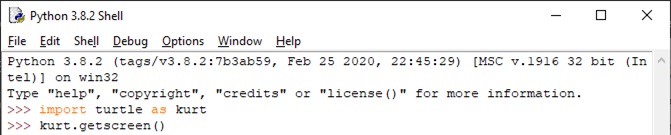
Step 3
Next is, type your turtle name, then add .getscreen() then press enter on your keyboard
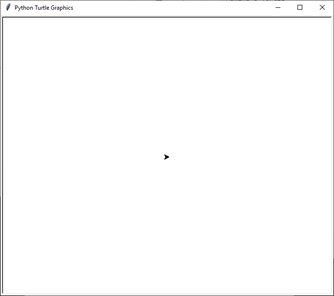
This should pop up on your screen, it is called the Python Turtle Graphics Window, this is where we will see the outputs of our provided code within our python shell.
Changing the title of our Python Turtle Graphics window can be done by using the title() function. Follow the steps below and let’s change the title of our Python Turtle Graphics window.

Step 1
Within the search bar of your computer type in “IDLE” and click the IDLE (Python 3.8 32-bit)

Step 2
Within the shell type “import turtle as“ then add the name of your turtle then press enter.

Step 3
Next is, type your turtle name, then add .title("New Title") then press enter on your keyboard to rename the title of our Python Turtle Graphics window.
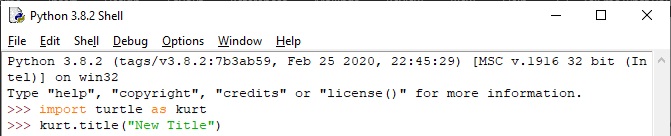
Before using the title() function

After using the title() function

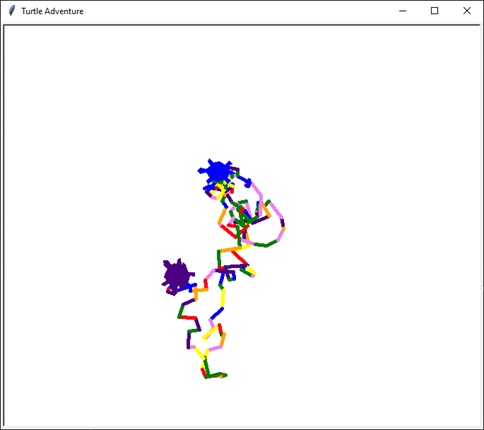
Here is one of the turtle programs I have made, I named it using the title() function as Turtle Adventure, with the title() function, we can rename our Python Turtle Graphics window into anything we want, if we were to create programs with Python’s Turtle Library it is best if we were able to name our programs accordingly, this is all possible thanks to the title() function.
Whenever we open our Turtle window, it always shows up with the default color. In this lesson we’ll be changing the background color of our Python Turtle Graphics window, and this can be done by using the bgcolor() function. Follow the steps below and let’s change the background color of our Python Turtle Graphics window.

Step 1
Within the search bar of your computer type in “IDLE” and click the IDLE (Python 3.8 32-bit).

Step 2
Within the shell type "import turtle as" then add the name of your turtle then press enter.

Step 3
Now think of a color you want, mine is orange, then, type your turtle name, then add .bgcolor(“orange”) then press enter on your keyboard to change the background color of our Python Turtle Graphics window.
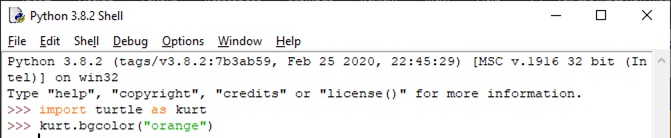
Let’s go and check the output of our code
Feel free to try different colors using the bgcolor functions and check the outputs, below are some of the colors I have tested using the function.


Now it’s time for us to make our turtle move, but first let’s enumerate the directions our turtle can take.

Now it’s time for us to make our turtle move, but first let’s enumerate the directions our turtle can take.
kurt.forward(100)
The 100 is how far should the turtle move forward
Let’s test this on our Python Shell
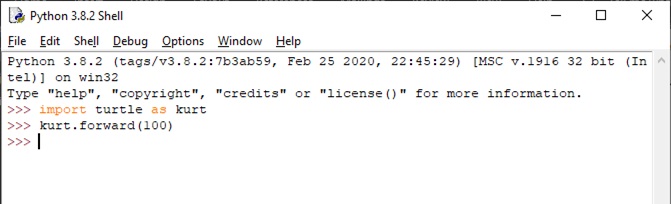
Let’s go type ”import turtle as” then add the name of your turtle then press enter, type your turtle name, then add .forward(100) then press enter.
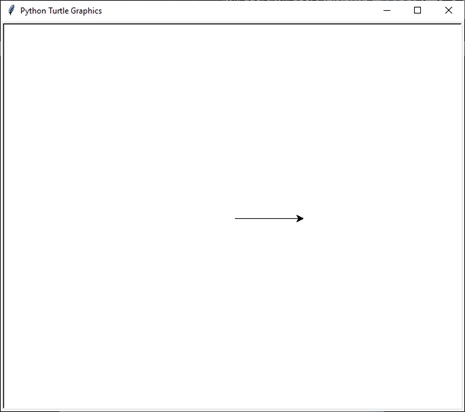
Hey look, our turtle moved, our turtle had moved forward with a distance of 100. Now let’s open our Python shell again and type in another code.
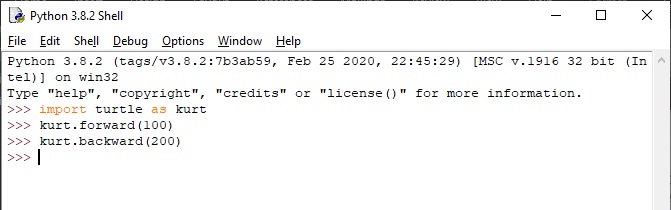
Now let’s type your turtle name, then add .backward(200) then press enter. and see how it goes on our Python Turtle Graphics window.
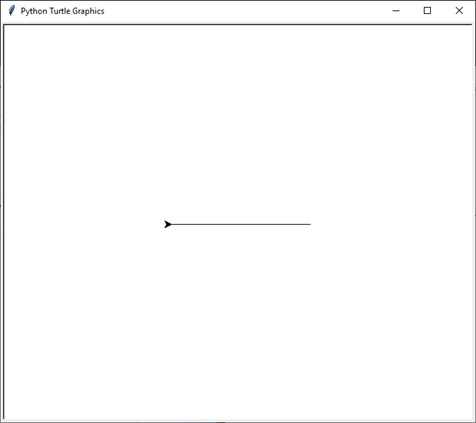
Our turtle moved backward with a distance of 200, on our next topic we’ll cover the left() and right() functions of Python’s Turtle Library.
Changing Turtle’s directions using left() and right() functions
kurt.right(90)
Here is an example of turning the turtle right, inside the parenthesis is a number known as Angle Units, we use angle units to turn our turtle, on this example we wish to turn our turtle right with the angle of 90 degrees. Let’s try to code that on our Python Shell and run it.
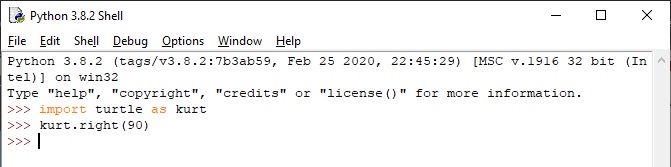
let’s type your turtle name, then add .right(90) then press enter, afterwards let’s check our Python Turtle Graphics window to see the change.

Look, our turtle changed the direction its pointing at. We can use left and right turtle functions to help change directions of our turtle.
Here is another example but this time using left() function to change the direction of our turtle
Let’s type your turtle name, then add .left(90) then press enter.
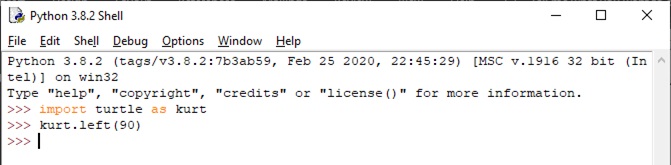
Now let’s check our Python Turtle Graphics Window if there is any change.

Feel free to change the value inside the parenthesis of the left and right functions and see to where your turtle will point at. On our next lesson we’ll be using all of these directional functions to make our turtle move on our Python Turtle Graphics Window.
Making the Turtle Move using forward(), backward(), right(), left()
Now that we have tried them all, let’s go and use some of the directional functions to make our Turtle move. Follow the directions below and we will make our turtle move.
Step 1
Within the search bar of your computer type in “IDLE” and click the IDLE (Python 3.8 32-bit)

Step 2
Within the shell type “import turtle as “ then add the name of your turtle then press enter.

Step 3
Let’s change the direction of the turtle to left by typing the name of your turtle then add .left(90) then press enter. We’ll use forward this time by typing the name of your turtle then add .forward(200) then press enter.
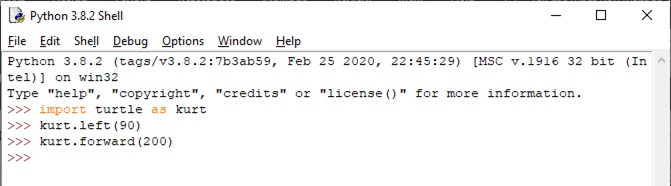
Step 4
Let’s change the direction of the turtle to right by typing the name of your turtle then add .right(90) then press enter. We’ll use forward this time by typing the name of your turtle then add .forward(150) then press enter.
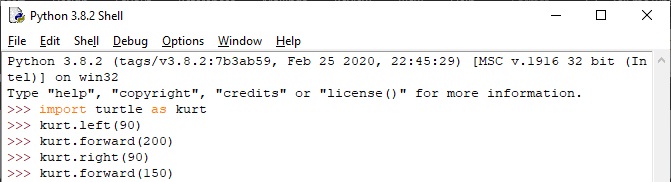
Step 5
We finish by changing the direction of the turtle to left by typing the name of your turtle then add .left(90) then press enter. We’ll use forward this time by typing the name of your turtle then add .backward(250) then press enter.
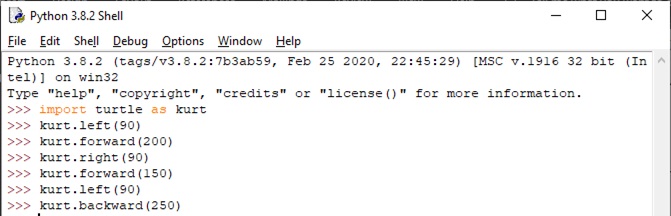
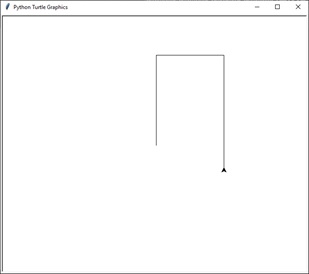
If you have followed the directions above this should be the output on your Python Turtle Graphics Window. If your output is different from mine, don’t worry it is okay so long as you were able to make your turtle move using the directional functions of the turtle library.
Are you ready for the next part? After learning the basics of moving our turtle, it is about time we create our first shape with Python’s turtle. We’ll do this in a step by step manner for everyone to keep up.
Step 1
Let’s type your turtle name, then add .forward(100) then press enter, we then type your turtle name again and type .left(90) afterwards press the enter key
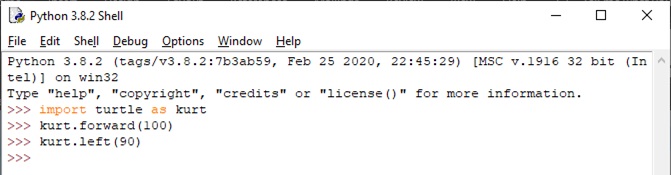
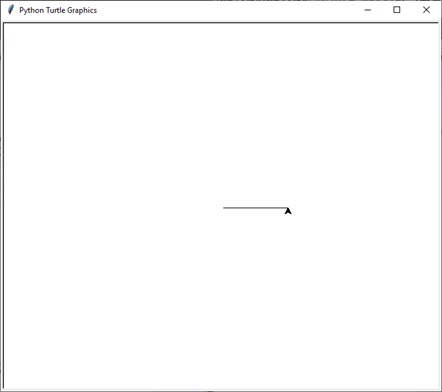
Nice, we got the first side of our shape This is what our turtle should look like on our Python Turtle Graphics windows.
Step 2
For the second side of our shape, let’s type your turtle name, then add .forward(100) then press enter, we then type your turtle name again and type .left(90) afterwards press the enter key.
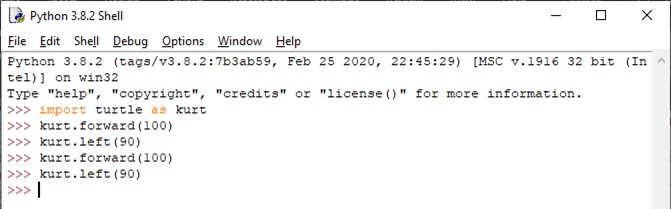
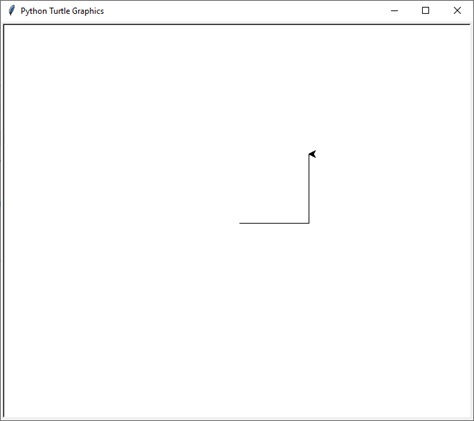
We’re halfway on making our first shape We have 2 sides now for our shape let’s continue on.
Step 3
Now for the third side of our shape, let’s type your turtle name, then add .forward(100) then press enter, we then type your turtle name again and type .left(90) afterwards press the enter key.
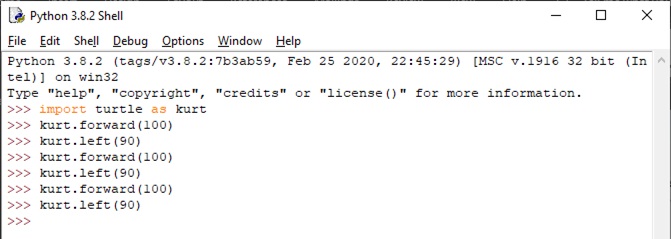
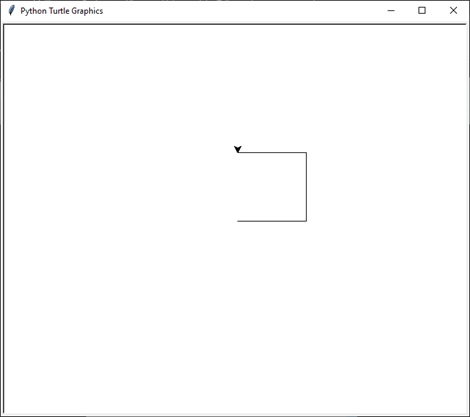
This should be the output of the code above, if you’ve followed it carefully, you should have the same output as mine.
Step 4
Now for the last side of our shape, let’s type your turtle name, then add .forward(100) then press enter, we then type your turtle name again and type .left(90) afterwards press the enter key.
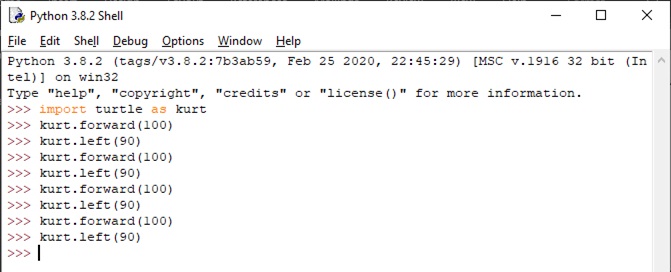
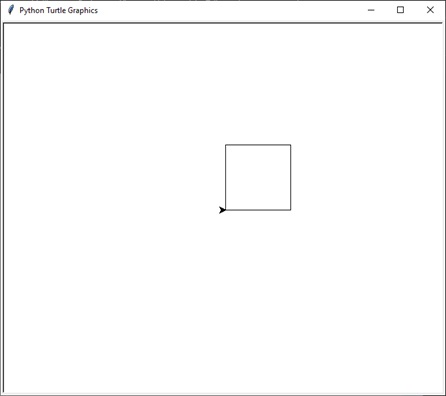
Congratulations, you were able to create your square using Python’s Turtle. On the following topics we’ll be making more shapes by following our step by step procedure.
Now drawing a triangle with Python’s Turtle is easier that drawing a square, just follow the steps below and I’m sure you’ll be able to come up with the same results. Let’s open our Python IDLE and begin coding.
Step 1
Within the Python Shell, let’s go and type in your turtle name, then add .forward(150) with this line of code we can create the base of our triangle, we went with 150 to make sure that the triangle is bigger.
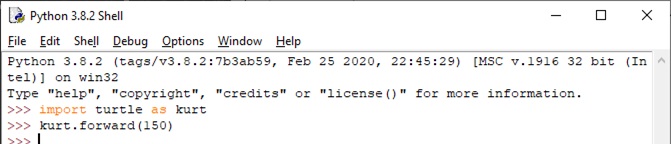
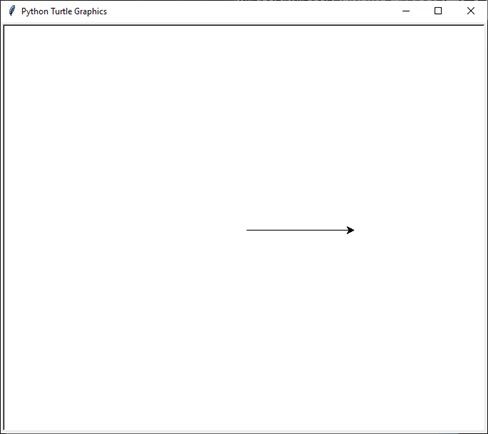
This is what our turtle should look like at our Python Turtle Graphics after entering kurt.forward(150)
Step 2
To make the second side of the triangle, let us type in your turtle name, then add .left(120) then press enter key, afterwards we type again your turtle name, then add .forward(150) and press enter key to make the second side of the triangle.
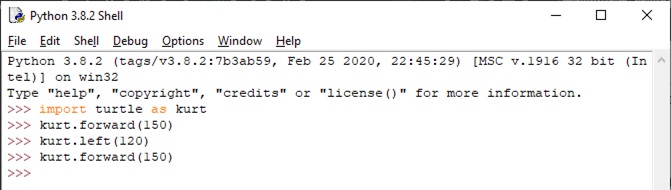
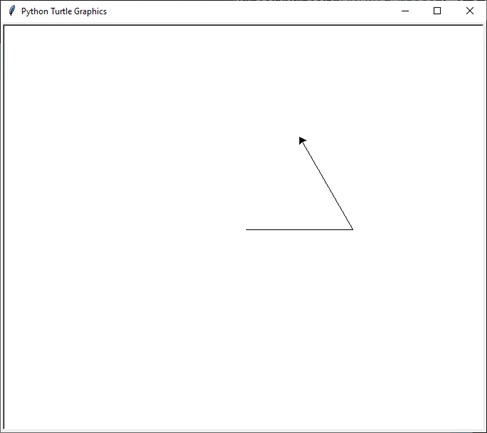
We’re so close, let’s go and draw the last side of our triangle on the next step.
Step 3
We’ll add the last side by typing your turtle name, then add .left(120) then press enter key, afterwards we type again your turtle name, then add .forward(150) and press enter key to make the last side of the triangle, now let’s check our Python Turtle Graphics for the result.
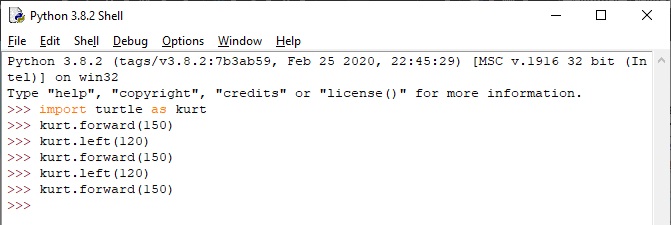
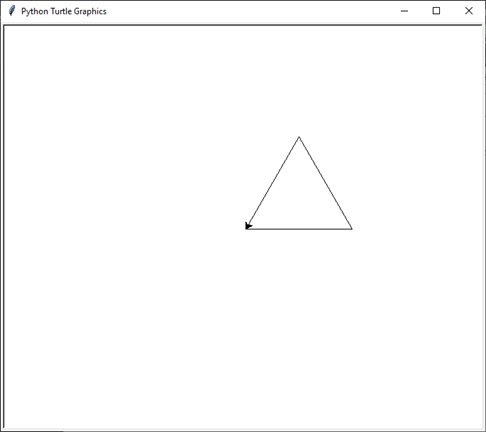
Great job, we manage to create a triangle using Python’s turtle. On our next lesson we’ll be making a circle using turtle.
The previous shapes we have drawn required quite a lot of typing, but this one only requires one line of code. We’ll be using the code “.circle()” to create a circle using Python’s Turtle.
kurt.circle(90)
Within the parenthesis of t.circle is where we can define the radius of our circle, to make it easy for you to understand, the higher the radius the bigger the circle drawn by our turtle.
Let’s draw our circle by typing your turtle name, then add .circle(90) then press enter key,
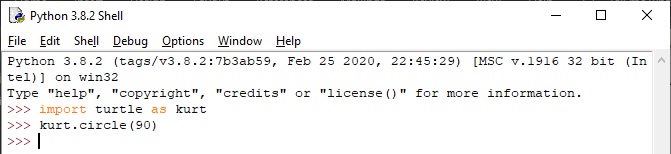
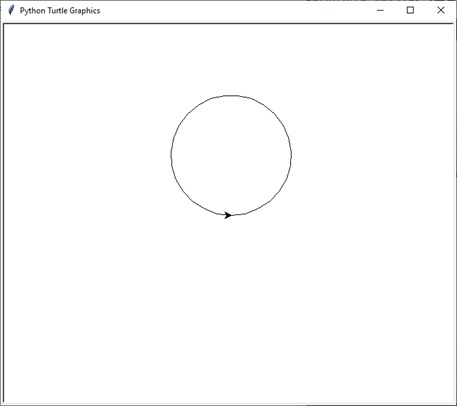
Great work, this should be he output in your python Turtle Graphics Windows.
When drawing using turtle there are chances where you have entered the wrong code, with the undo function we will be able to undo that mistake. We’ll be using the undo function to undo the circle we have drawn on our previous lesson.
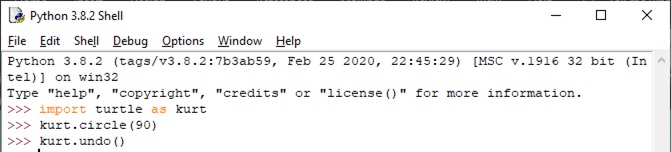
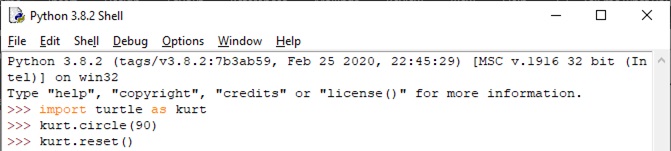
The reset function however works differently as it resets the content of the entire Python Turtle Graphics window as seen below

Did you know that the arrow shape you see on our turtle is one of the many shapes our turtle can take form? The default shape of our turtle is “classic” but, in this lesson, we can change its shape into an actual turtle and many more.
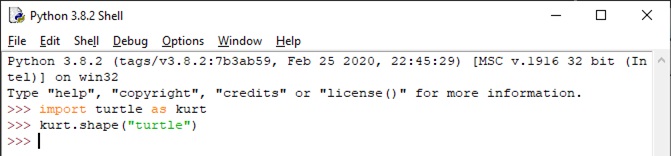
turtle.shape(“turtle”)
With the parenthesis of the shape() function we can define what shape our turtle will take. Let’s try changing our turtle’s shape into an actual turtle with a demonstration.
Changing the Shape of the Turtle
Step 1
Within the Python Shell, type import turtle, then type as, then add your given name on your turtle, mine is kurt.

Step 2
type in kurt.shape(“turtle”) then press the enter key on your keyboard.
Step 3
Check your Python Turtle Graphics and see the change.

Here are the Available Shapes our Turtle may turn into.

The stamp function allows us to leave imprints of our turtle on our Python Turtle Graphics Window. Let’s go and try it by using other functions such as directional functions and shape to change our turtle’s shape then we’ll leave imprints of our turtle using the stamp function.
Step 1
Within the search bar of your computer type in “IDLE” and click the IDLE (Python 3.8 32-bit)

Step 2
Within the shell type “import turtle as “ then add the name of your turtle then press enter.

Step 3
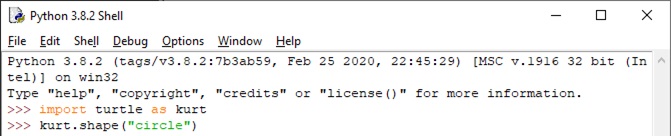
Let us change our turtle shape into a circle, type your turtle name, then add .shape(“circle”) then press enter on your keyboard.
Step 4
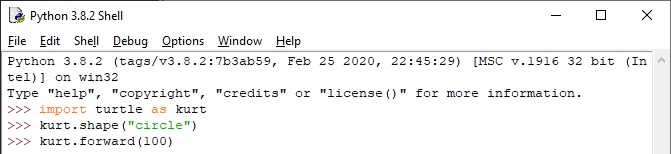
Let’s add a forward function, type your turtle name, then add .forward(100) then press enter key.
Step 5
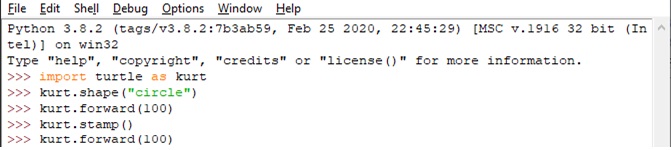
To imprint, a stamp, type your turtle name, then add .stamp() then press enter, afterward, type your turtle name, then add .forward(100) then press enter.
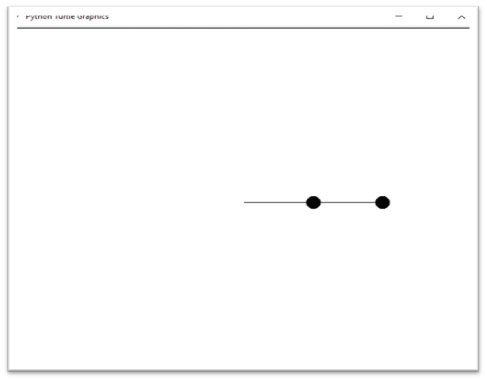
That concludes our topic on stamps, our next topic is all about the shapesize function, another function used to customize the turtle. See you at the next lesson and happy coding.
Here you’ll be learning to change the shape size of our turtle using the shapesize function of Python’s Turtle library. I’ll be providing the definition, uses, and apply the shapesize function to modify our turtle, alongside the parameters that define the change in the shape size of our turtle.
What is shapesize()?

Shapesize is a function that allows us to either increase or decreases the size of our turtle based on the parameters within the parenthesis of the function. The change in the size of the turtle however does not affect the output drawn by our turtle.

You can change the size of the turtle by typing in shapesize(), within the parenthesis we can input 3 numbers separated by a comma. The three parameters are Stretch length, Stretch width, and Outline width. Feel free to try it out on your Python shell to change the size of your turtle that suits the project you are working on.
We’ll be covering in this lesson the penup and pendown functions, how they are used and how can we make use of them on our turtle programs. In this lesson, I’ll be showing examples of how penup() and pendown() functions are used. Follow the guide below as we learn and apply these functions.
Step 1
Within the search bar of your computer type in “IDLE” and click the IDLE (Python 3.8 32-bit).

Step 2
Within the shell type “import turtle as “ then add the name of your turtle then press enter.

Step 3
Let’s use the penup function by typing your turtle name, then add .penup() then press enter on your keyboard.
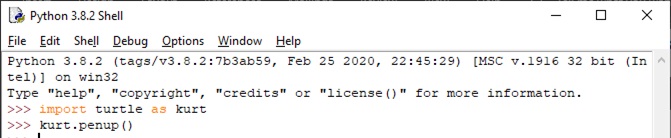
Step 4
Let’s type your turtle name, then add .forward(100) then press enter on your keyboard.
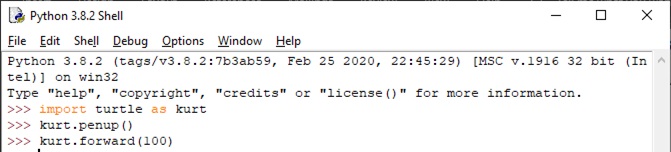
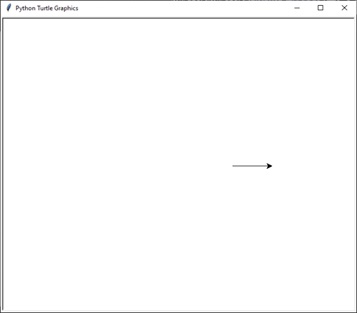
Before we proceed let’s go and check the output on our Python Turtle Graphics Window. Look, our turtle moved without drawing a line. This is because we have used the penup() function, this prevents the turtle from drawing as it moves.
Step 5
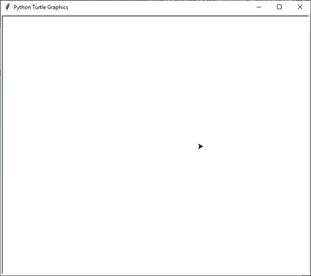
Let’s use the pendown and forward function by typing your turtle name, then add .pendown() then press enter, for the forward function type your turtle name, then add .forward(75) then press enter.
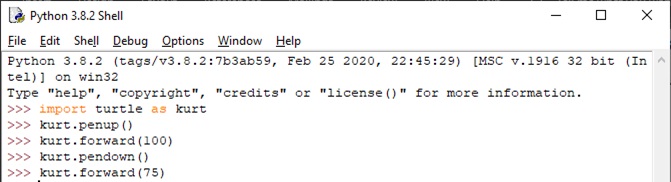
With the pendown function added, our turtle is informed that it can now draw once more within our python turtle graphics window, this is proven by making our turtle move forward with the distance of 75 within our python turtle graphics window.
That concludes our topic on the pendown and penup functions, our upcoming topics will revolve around customizing our pen, functions such as pencolor and fillcolor function. See you at our next lesson, Happy coding guys.
This time we’ll be covering fillcolor(). This function allows us to fill the shapes we draw with any color we want. We will be creating a shape in this tutorial and apply the fillcolor function. Let’s type it on our Python Shell, then let’s make our turtle move forward to see if there is any change to the line drawn.

Step 1
Within the search bar of your computer type in “IDLE” and click the IDLE (Python 3.8 32-bit).

Step 2
Within the shell type “import turtle as “ then add the name of your turtle then press enter.

Step 3
To change the color, type in your turtle name then add .pencolor(“blue”) then press enter.
Step 4
Let’s make our turtle move forward, type your turtle name, then add .forward(100) then press enter on your keyboard.
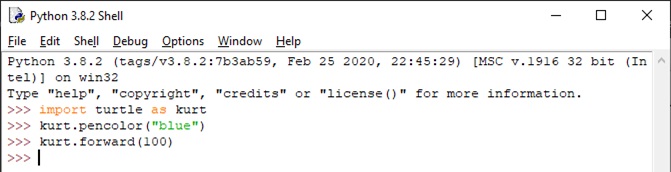
The pencolor function helps us to customize the color of our pen to suit the program we are developing. On our next topic, we will be discussing how to change the fill color using the fillcolor function. See you on the next topic, Happy coding.

This time we’ll be covering fillcolor(). This function allows us to fill the shapes we draw with any color we want. We will be creating a shape in this tutorial and apply the fillcolor function.

Step 1
Within the search bar of your computer type in “IDLE” and click the IDLE (Python 3.8 32-bit).

Step 2
Within the shell type “ type your turtle nameimport turtle as
“ then add the type your turtle namename of your turtle then press enter.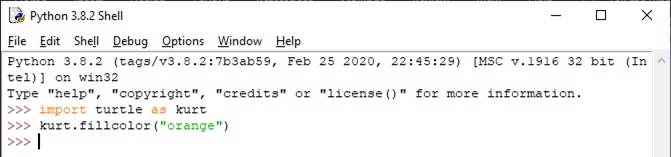
Step 3
Next is, type your turtle name, then add .fillcolor(“orange”) then press enter on your keyboard.
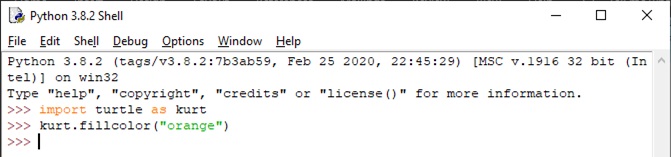

That should conclude our topic regarding fillcolors, on our next topic we’ll be discussing the begin_fill and end_fill functions to fill any shape with any color we declare using the fillcolor function. See you on our next topic, Happy coding.
On this topic, we’ll be covering Turtle’s begin_fill() and end_fill() functions and draw shapes to which we’ll fill them with any color we want. We will also be using our previous learnings on the fillcolor() functions.
What are begin_fill and end_fill?
Begin_fill and end_fill are functions that allow us to fill a shape with any color we want, we use the begin_fill() function to tell python that we’ll begin drawing the shape and when finished they will fill it with a color. The end_fill() function tells python that the drawing of the shape is finished and to fill it with the color we want using the fillcolor functions from our previous lesson.
Step 1
Within the search bar of your computer type in “IDLE” and click the IDLE (Python 3.8 32-bit).

Step 2
Within the shell type “import turtle as “ then add the name of your turtle then press enter.

Step 3
Now, type your turtle name, then add .begin_fill() then press enter on your keyboard.
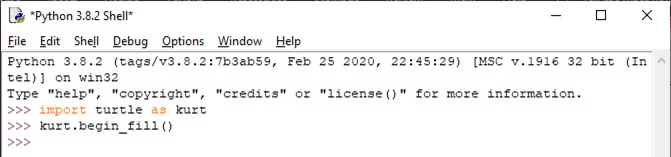
Step 4
Let’s draw our Circle, type your turtle name, then type .circle(90) then press enter.
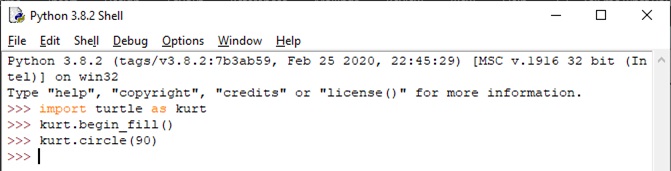
Before we proceed let’s check what our output is so far on our Python Turtle Graphics window.
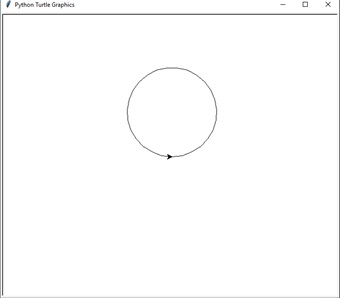
Step 5
Think of what color you want for our shape, for this example, we’ll be using orange, once you have chosen what color, type your turtle name, then type .fillcolor(“orange”) then press enter.
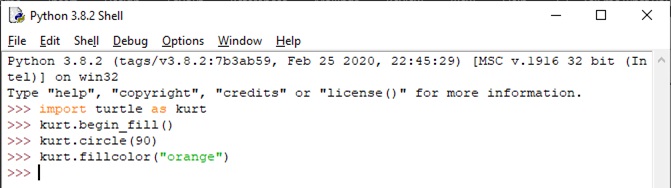
Step 6
To fill our shape with the color, type your turtle name, then type .end_fill() then press enter. Let’s go and check out our output on the Python Turtle Graphics.
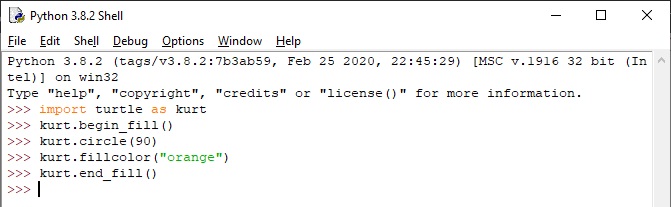
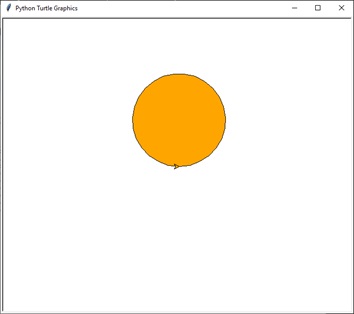
Congratulations we were able to draw a circle and fill it with the color we want. You can also create other shapes and fill them with any color you want. Now let’s go and try to make a triangle and fill it with the color yellow.
Step 1
Within the search bar of your computer type in “IDLE” and click the IDLE (Python 3.8 32-bit).

Step 2
Within the shell type “import turtle as “ then add the name of your turtle then press enter.

Step 3
Now, type your turtle name, then add .begin_fill() then press enter on your keyboard.

Step 4
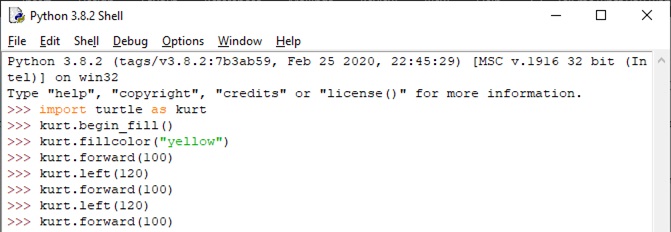
Now let’s create the triangle follow the steps below to create the triangle.
- To draw the first side of the triangle, type your turtle name, then type .forward(100) then press enter, then type your turtle name then add .left(120) afterward press enter.
- For the second side of the triangle, type your turtle name, then type .forward(100) then press enter, then type your turtle name then add .left(120) afterward press enter.
- For the third and last side of the triangle, type your turtle name, then type .forward(100) then press enter.
Step 5
After drawing the triangle, we then type your turtle name, then type .end_fill().
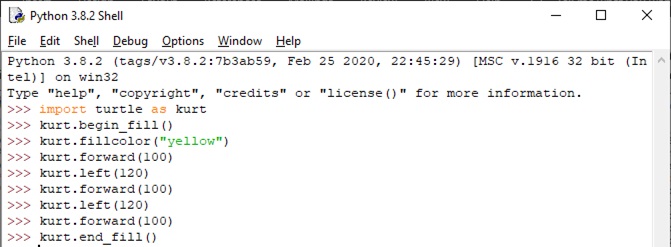
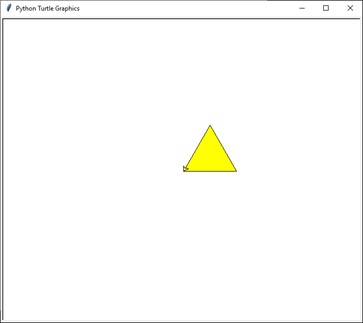
Amazing work, we were able to create a triangle and even fill it up with the color yellow. That concludes our topic on begin_fill and end_fill function, our next topic is all about the goto function. See you on our next topic and happy coding everyone.
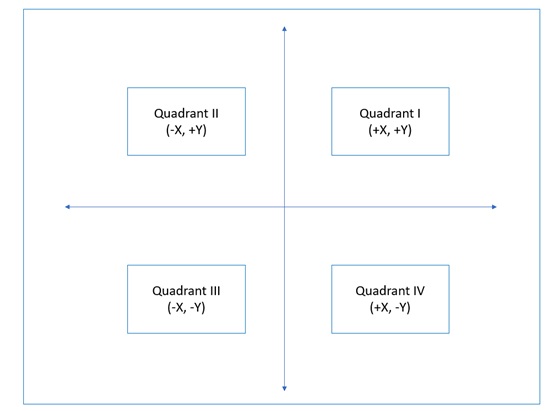
Our Python Turtle Graphics window is divided into 4 quadrants. Within the goto() function, we can enter the x and y coordinates to move our turtle to that position. We’ll demonstrate this on our Python shell and see the output from our Python Turtle Graphics.

Below are the locations of the 4 Quadrants and their respective coordinates.
Step 1
Within the search bar of your computer type in “IDLE” and click the IDLE (Python 3.8 32-bit).

Step 2
Within the shell type “import turtle as “ then add the name of your turtle then press enter.

Step 3
Now let’s go to Quadrant II, type your turtle name, then add .goto(-100, 100) then press enter on your keyboard.

Step 4
Now let’s go to Quadrant II, type your turtle name, then add .goto(-100, 100) then press enter on your keyboard.

Aside from the directional functions, we have discussed on our earlier topics, the goto function allows us to move to a specific position. We will be this function again on our following topics.
That concludes our topic on the goto function of Python’s Turtle library. Our next topic would be about the clone function, see you on our next topic and happy coding.
Did you know that we can create clones of our turtle? We can also have these clones do whatever our turtle can do, we can have them move using the directional functions, modify their shape, size, their pencolor, and many more. Within this topic, we’ll create a clone of our turtle and change its overall look. Let’s start by opening our python shell.
Step 1
Within the search bar of your computer type in “IDLE” and click the IDLE (Python 3.8 32-bit).

Step 2
Within the shell type “ import turtle as “ then add the name of your turtle then press enter.

Step 3
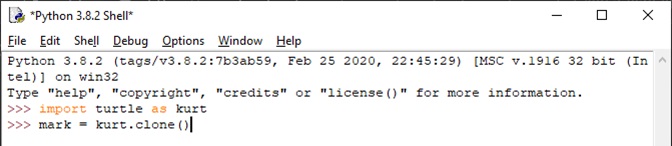
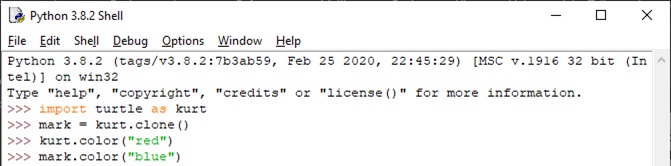
To make a clone of our turtle let’s think of a unique name for our second turtle, then add the name of your second turtle then add a = sign then add the name of your original turtle then add .clone() then press enter.
Step 4
We should change the colors of our turtle so that we won’t get confused as we try to run some functions to them. We’ll change the color of our original turtle into red, while the color blue goes for our cloned turtle.
- For our original turtle, type the name of your original turtle then add .color(“red”) then press enter key.
- For our cloned turtle, type the name of our cloned turtle then add .color(“blue”) then press enter key.
Step 5
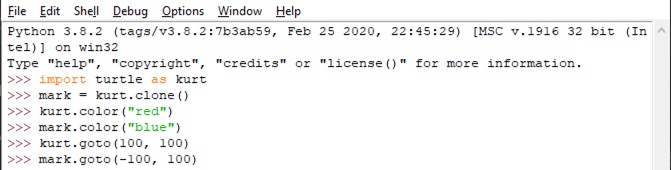
Let’s move them into different Quadrants using our previous lesson’s goto function.
- For our original turtle, type the name of your original turtle then add .goto(100, 100) then press enter key.
- For our cloned turtle, type the name of our cloned turtle then add .goto(-100, 100) then press enter key.
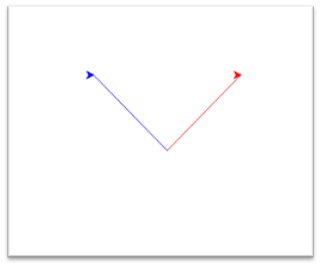
That concludes our topic on clone function. To test our learnings, we’ll be having an activity. We will be making a simple turtle racing program. See you at our activity, happy coding everyone.
Loops are part of the fundamentals of a programming language that is why we need to know how it works. We’ll be covering the For-loop statement as we will be needing it on making our snake game.
If you haven’t noticed, when we have first drawn a square using a turtle, we ended up repeating the same lines of code, especially when making the sides of the square.
kurt.forward(100)
kurt.left(90)
This is the line of code we ended up using four times to make a square. We’ll be making the same shape after this lesson but this time we’ll be using for loop to minimize the coding.
What is a For loop?
For loops are control structures that run a block of code within it a given number of times.

Now that you know what a for loop is and the parts of a for loop statement, we’ll be using for loop on making our square and compare it from our previous code that doesn’t use the for loop statement.
Step 1
Within the search bar of your computer type in “IDLE” and click the IDLE (Python 3.8 32-bit).

Step 2
Within the shell type “import turtle as “ then add the name of your turtle then press enter.

Step 3
To make a for-loop statement type, for x in range (4): then press enter on your keyboard. The statement means we’ll be executing the codes below the loop 4 times.
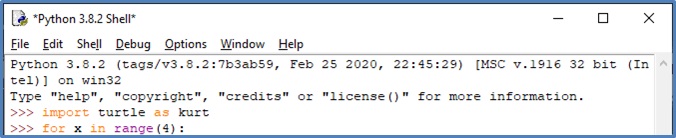
Step 4
Type name of your turtle then add .forward(100) then press enter, then type the name of your turtle then add .left(90) then press enter twice to run the code.
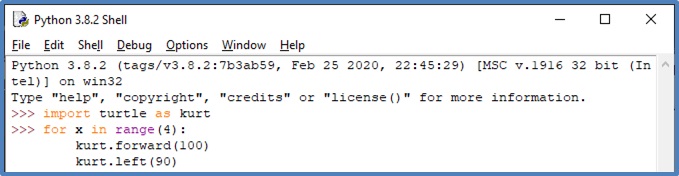
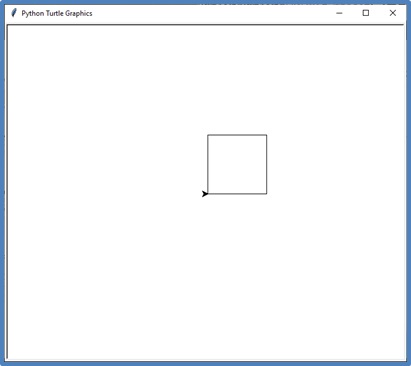
Comparison of the 2 Approaches on Drawing a Square
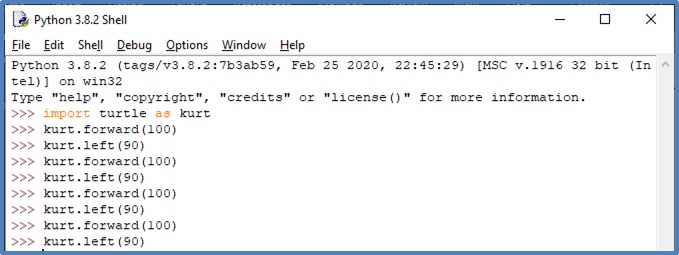
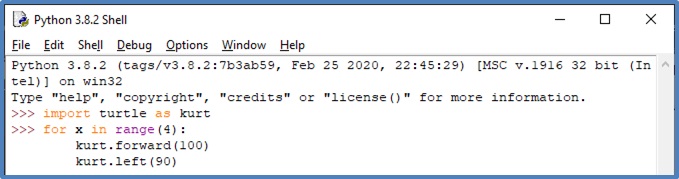
See the difference between the two approaches? We were able to simplify the creation of a shape using the for-loop statement. Remember we can use loops to execute a block of code depending on the number of times we want.
That concludes our topic on looping, we’ll be having another activity, this time, we’ll be drawing a star using the for-loop. See you at the next activity and happy coding.
Conditional statements are also part of the fundamentals of a programming language and after tackling the for-loop, this time we’ll be learning them, particularly, if conditional statement. We’ll be using this on our snake game so we need to learn what are conditional statements are.

To make things easy to understand, let’s think of a scenario you can relate to.
Your parent gave you 2 chocolate bars, chocolateA has peanuts which you are allergic to while chocolateB doesn’t have peanuts. You have picked chocolateB, the one without peanuts to avoid you getting an allergy. You performed the if condition within your brain by checking the condition, and if the condition is true, you’ll eat that chocolate.
Let’s convert the scenario above into a code.
- On your Python Shell, type chocolateA = “has peanuts” then press the enter key.
- Next, type chocolateB = “has no peanuts” then press the enter key.
- We then add the if (chocolateA == “has no peanuts”): then press the enter key.
- Next, let’s type print(“Eat chocolateA”) then press the enter key twice.
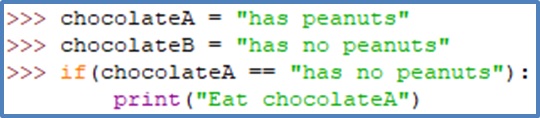
After pressing the enter key twice, you’ll see that there is no output from the Python Shell. The reason why there is no output from the Python Shell is that chocolateA has peanuts, the if condition states that there must be no peanuts so that you may eat that chocolate.
Let’s try chocolateB
- We then add the if (chocolateB == “has no peanuts”): then press the enter key.
- Next, let’s type print(“Eat chocolateB”) then press the enter key twice.

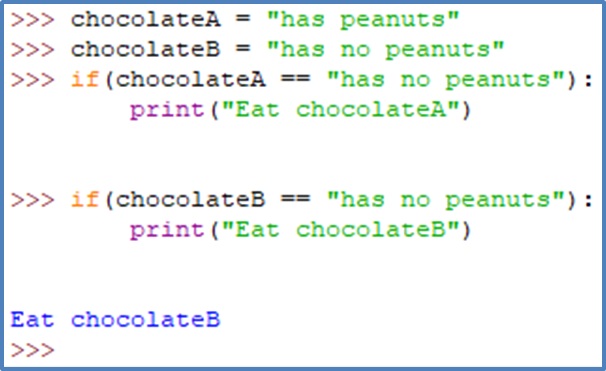
Since chocolateB have no peanuts, it had passed the condition of our if statement and printed out “Eat chocolateB on our Python Shell. We’ll be using this conditional statement on the snake game that we’ll be developing so feel free to test the sample given above and try changing conditions and see what would be the output.
That concludes our topic on if conditional statement, on our next topic we’ll be learning how to use while loop and the break statement. See you on our next topic, Happy coding everyone.
This time we’ll be discussing the while loop statement alongside the break statement as we will be needing these statements for our snake game.
Both for loop and while loop is primitive loops of python, their function is to run a block of code within them as long as the conditions are still valid. This one of the important things a programmer should know but don’t worry if you have no idea about a while loop, I’ll be providing an example and brief explanation on what a while loop is and how it works.
What is a While Loop?

Similar to a for loop, the while loop will execute a block of code as long as the conditions are met. But there are instances that the loop doesn’t stop and go on an infinite looping state. Let’s go on and try a while loop on our Python Shell, we’ll be creating a triangle using a while loop and we’ll be demonstrating an infinite loop using the while looping statement.
Let’s try the while loop on our Python shell.
Step 1
Within the search bar of your computer type in “IDLE” and click the IDLE (Python 3.8 32-bit).

Step 2
Within the shell type “import turtle as “ then add the name of your turtle then press enter.

Step 3
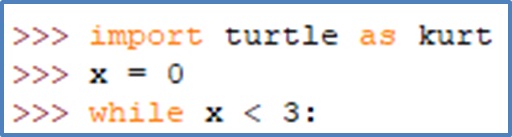
We need a create a variable x with a value of 0 to help us keep track of our while loop, let’s type on your Python Shell, x = 0 then press the enter key.

Step 4
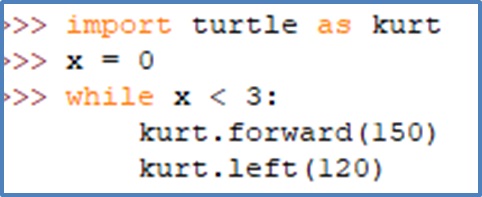
To make a while-loop statement type, while x < 3: then press enter on your keyboard. The statement means we’ll be executing the codes below the loop 3 times to draw the 3 sides of our triangle.
Step 5
Type your turtle name then add .forward(150) then press enter, next is for the left function, type in your turtle name then add .left(120) then press enter.
Step 6
Now let’s go and add an increment to the variable x to prevent an occurrence of an infinite loop, to do this, type x += 1 then press enter key.
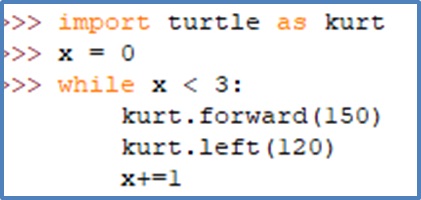
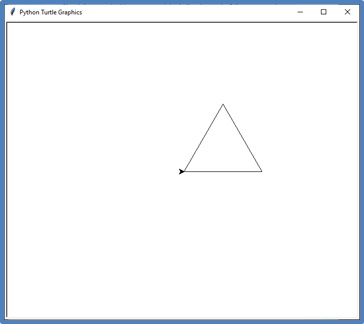
Nicely done, we were able to make a triangle using a while loop, now you might be wondering what is the x += 1 for anyway? This makes sure that whenever the block of code under the while loop is executed it counts the number of times it has done the loop, and if the variable x is no longer less than 3, it will stop the loop. but If we didn’t add the increment, our turtle will draw triangles and won't stop unless we close the Python Turtle Graphics. We’ll try the break statement in the next topic.
The break statement is used to stop loops, this applies to both for and while loop. It is usually executed through the use of an if conditional statement that breaks the loop if the conditions are true.
The break statement is used to stop loops, this applies to both for and while loop. It is usually executed through the use of an if conditional statement that breaks the loop if the conditions are true.
Step 1
Within the search bar of your computer type in “IDLE” and click the IDLE (Python 3.8 32-bit).

Step 2
Within the shell type “import turtle as “ then add the name of your turtle then press enter.

Step 3
We need a create a variable x with a value of 0 to help us keep track of our while loop, let’s type on your Python Shell, x = 0 then press the enter key.

Step 4
To make a while-loop statement type, while x < 3: then press enter on your keyboard. The statement means we’ll be executing the codes below the loop 3 times to draw the 3 sides of our triangle.
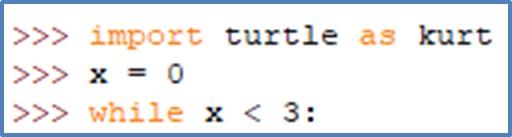
Step 5
Now let’s go and type if x == 2: then press the enter key, afterward type break then press enter.
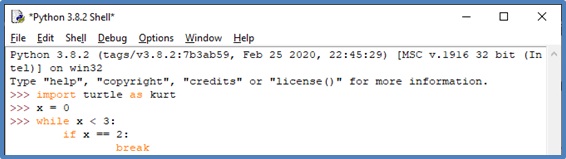
Step 6
Type your turtle name then add .forward(150) then press enter, next is for the left function, type in your turtle name then add .left(120) then press enter, lastly, type x += 1 then press enter twice.
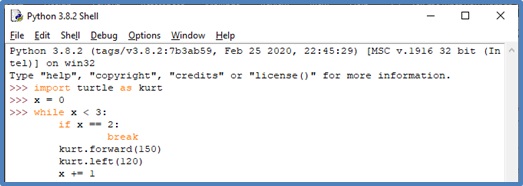
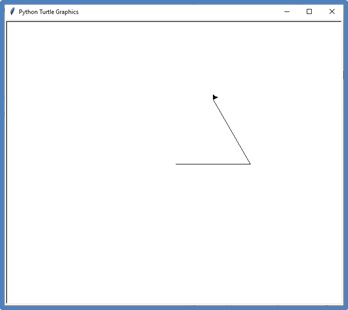
Check out your Python Turtle Graphics and see the output of our source code. You’ll notice that the triangle is incomplete as it has only 2 sides instead of 3, this is because we have stated in our if-condition that if the forward and left functions are executed twice, the break statement is activated. This stops the while loop from progressing. With all of these taught, I’ll be introducing an IDE we will be needing for our final output on this module.
The snake game, one of the best games there is before the time of portables consoles and consoles alike. In this tutorial, I’ll be teaching you how to make a snake game by using functions we have used throughout this module. Don’t worry if you do not get some of the codes we’ll be using as I will leave the source code at the end of the module for you to use and run on your respective Python IDE. To make things easy on making the snake game, we will be using PyCharm as our IDE.
Let’s have a short recap on what a snake game is and how it is supposed to look like.
A Snake Game should have:
- A window where the game will take place.
- A scoring board to monitor the score.
- A snake will eat the food and roam around the window.
- A food that the snake will eat to grow.
The snake is not allowed to:
- Bite itself.
- Hit the edges of our window.
How to Install PyCharm on my Computer?
Step 1
Type on your browser’s search bar “download PyCharm” then press enter.
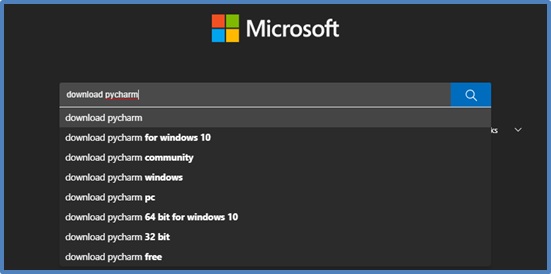
Step 2
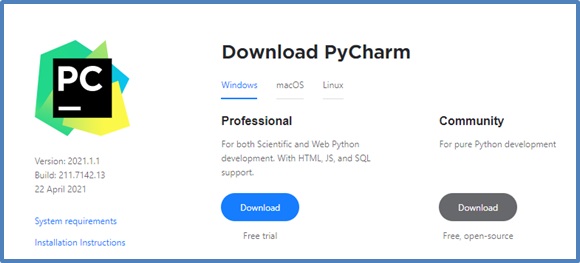
After pressing the enter key, the first link that shows up is what you’ll be clicking and you’ll be redirected to the JetBrains PyCharm download page.
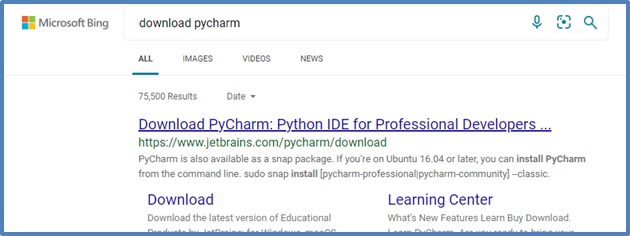
Step 3
Select the Community version as it is free and is all we will be needing for our snake game.
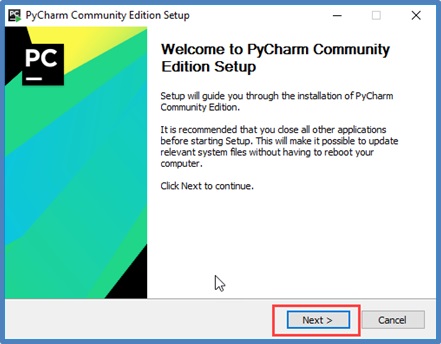
Step 4
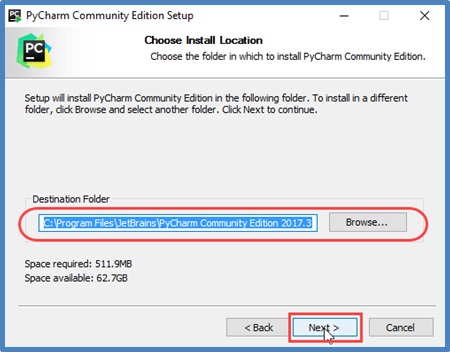
After clicking the next button, the installer will ask for a destination folder where files of the program will be stored. Simply click the next button.
Step 5
It would be great to know if your computer is a 32-bit or 64-bit, within the installation window check the checkbox that suits your then press the next button.
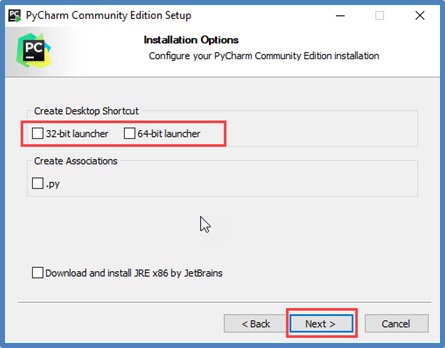
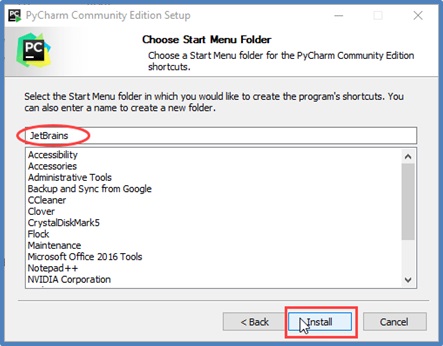
It would be great to know if your computer is a 32-bit or 64-bit, within the installation window check the checkbox that suits your then press the next button.
Pressing the install button will begin the installation on your computer, wait patiently as it installs PyCharm.
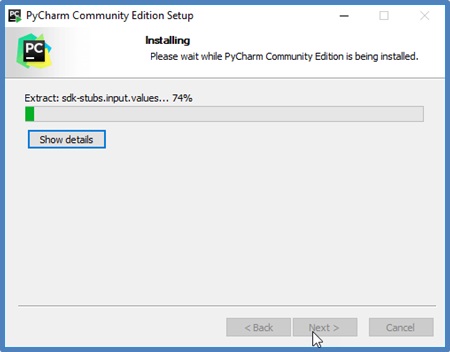
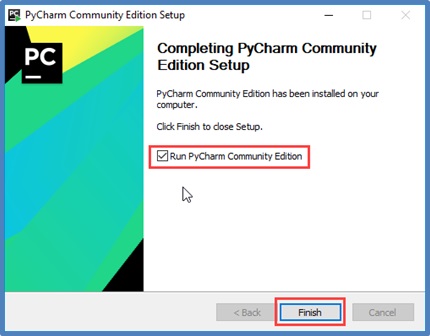
Step 6
After the installation, check the checkbox and click finish so that we can run PyCharm.
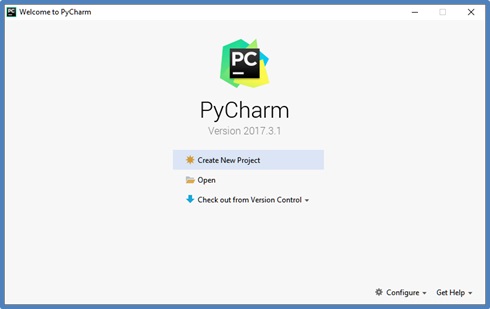
Let’s go on ahead and Create a New Project and we’ll name it Snakes
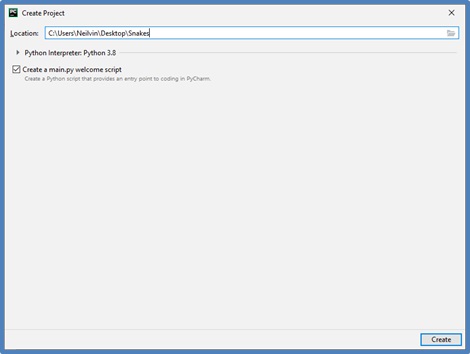
Now that we have our PyCharm, on our next topic, we’ll be checking out the PyCharm Environment.
Now that we have the IDE that we’ll be using for our snake game, let’s take some time to explore and code with PyCharm.
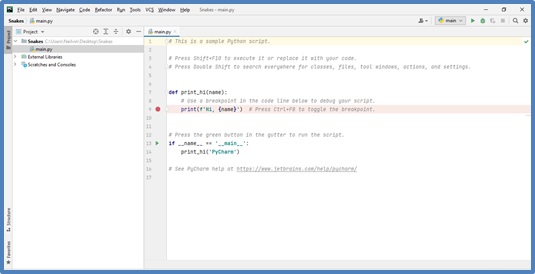
After creating the Snakes project folder, PyCharm will generate files for your project, but for our Snakes Project, we’ll only be using the main.py file to develop it.
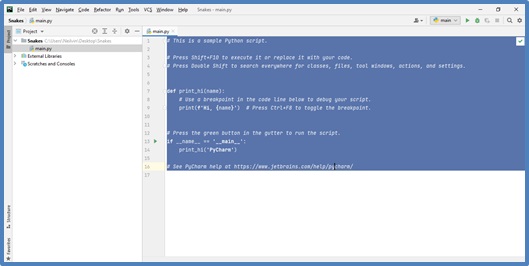
We won’t be needing the codes within the main.py so we’ll be deleting them. Simply press on your keyboard Ctrl + A to select all of the codes within the file then press the delete button.
Let’s go and make a square with for loop on PyCharm IDE.
Step #1: import turtle as pen then press the enter key.
Step #2: Now for our For loop, type for x in range(4): then press enter key.
Step #3: We’ll now insert the code to draw the sides of our square, type in pen.forward(100) then press enter, and then we’ll add pen.left(90) then press enter key.
Step #4: We’ll be adding an exitonclick() function, unlike the python shell, here in PyCharm the Python Turtle Graphics tend to close itself after the code is executed. To prevent this, let’s type pen.exitonclick() then press the enter key.
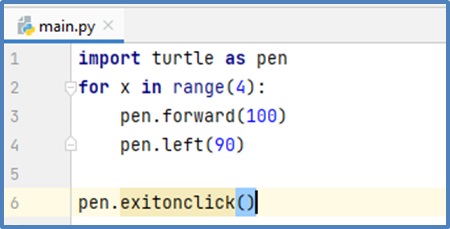
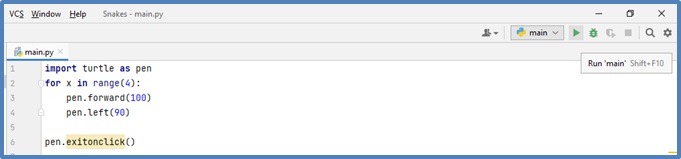
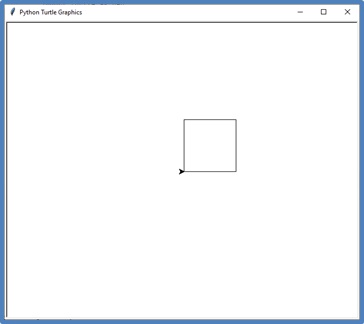
See how our code works here like on Python Shell? Through PyCharm, we can easily make our snake game, as we can monitor any errors we accidentally make. There are some other IDE’s out there for python program development and they all work the same with some tools added.
That concludes our topic on the PyCharm IDE. Coding is easier on the PyCharm IDE, there are other IDE’s out there you can use but for this module, we’ll be using PyCharm.
After learning all of these, it’s time we begin developing our snake game, I’ll see you then, happy coding everyone.
Now that you know how to make a python program using PyCharm, let’s go on and proceed on coding our snake game.
Within our main.py file.
Let’s clean the source code from our previous example, press Ctrl + A keys on your keyboard, and then press the delete button to clear our source code.
Step 1
- To make the overall snake game we’ll be needing the turtle library, so let’s go and type import turtle then press the enter key.
- We’ll also be delaying some executions of some block of codes within our Snake game, this can be done through the usage of the time library, let’s import it by typing import time then press the enter key.
- Lastly, we want the spawning of the food for our snake to be random, that’s why we’ll be needing the random library. Import it by typing import random then press the enter key.
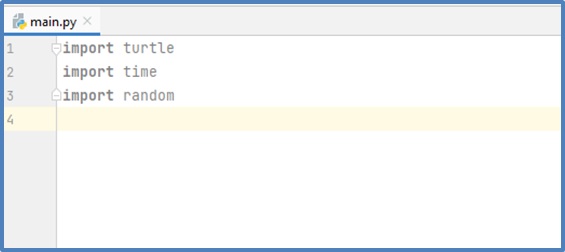
This is what the source code of your main.py looks like. Now that we have the imports let’s proceed on the next steps.
Step 2
Making a window
- To make the window, we will be creating a variable named window and we’ll be using turtle’s screen function. This allows us to use and manipulate it for our snake game. Let’s type window = turtle.Screen() then press the enter key.
Customizing the Window
- Let’s change the title of our window into “Snakes”, type Let’s type window.title("Snakes") then press the enter key.
- We’ll also be changing the color of the window into blue by typing window.bgcolor("blue") then press the enter key.
- The window for our game must have a width and height of 600, for this, we’ll be typing in window.setup(width=600, height=600) then press the enter key.
Disabling Automatic screen updates for our Game
- With all the activities on our window, the screen tends to update itself, because of this you’ll notice some lagging as you play. Let’s disable it by typing window.tracer(0) then press the enter key.
Now we can run our code but if you do, you’ll notice that it closes itself after running the code, to make sure that our window stays up let’s type window.mainloop() then press the enter key.
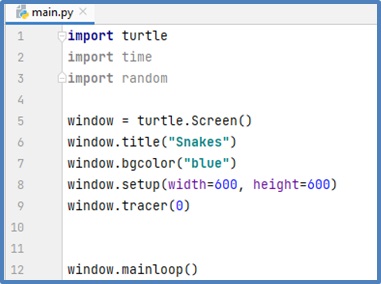

Within this blank area, press the enter key thrice to make new lines and space for us to insert the rest of the code for our python game.
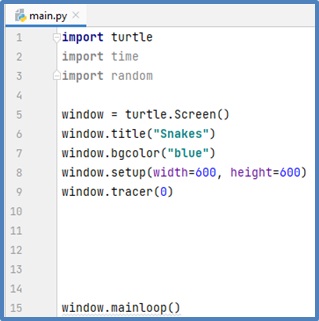
The spaces you’ve created will be used to add other functions we haven’t declared yet for our snake game. Now let’s proceed to the next step, the creation of our scoring board for our snake game.
Step 3
Initializing score and high_score variables
For us to count the score whenever our snake gets to eat its food, we need to initialize the variable score and high_score so that we can monitor the high score.
- Type score = 0 to declare and initialize score then press enter key.
- Type high_score = 0 to declare and initialize high_score then press enter key.
Creating new turtle named text for the text display of scores
- To make a new turtle we simply type text = turtle.Turtle() then press enter key.
- We want to move our turtle up but before we do, we need to raise the pen first to prevent it from drawing on our window. To do this type text = penup() then press enter key.
- Let’s move our turtle to the upper part of our window, type text.goto(0, 250) then press enter key.
- To add the text for our score board type text.write("Your Score : 0 Current High Score : 0", align="center", font=("Century", 16, "bold")) then press the enter key.
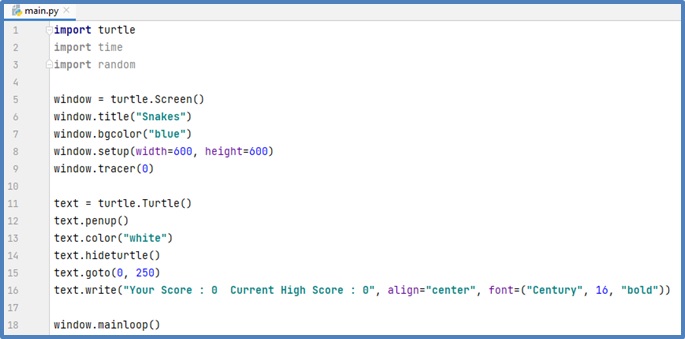
Step 4
Now that we’ve added the scoreboard let’s go on and add the head of our snake for our snake game.
Customizing the head of our snake.
- To make the head of our snake, we first have to create a variable named head and initialize it as a turtle. Let’s type on our source code snakehead = turtle.Turtle() then press enter key.
- Now that we have a snakehead, let’s change its shape with the shape() function. For our snakehead, its shape to be a square, to do that, type snakehead.shape(“square”) then press enter key.
- For our snakehead we want its color to be white to ensure that we can see our snake on our snake game. Let’s go and type snakehead.color(“white”) then press enter key.
Finalizing our snakehead.
Since our snakehead is a turtle it will draw lines as it moves through our snake game window, to prevent this from happening, we must use the penup function. Another thing is that our snakehead just like other snake games, must not move, not until we press the directional controls to make it move.
- Let’s raise the pen of our snakehead by typing snakehead.penup() then press the enter key.
- We’ll stop our turtle for the meantime by typing snakehead.direction = "Stop" then press the enter key.
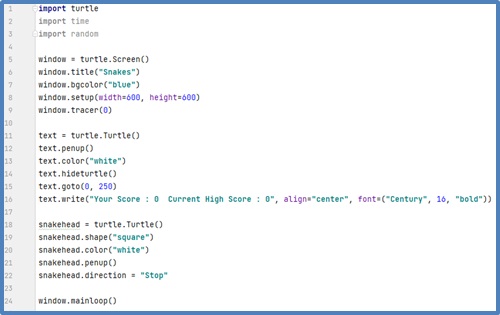
Step 5
For our snake to grow it will need its food within the game. To do that we will be creating another variable named food and initialize it as a turtle.
Initializing and customizing our snake food.
- To make the food for our snake, we first have to create a variable named food and initialize it as a turtle. Let’s type on our source code food = turtle.Turtle() then press enter key.
- Now that we have the food for our snake, let’s change its shape with the shape() function. For our snake food, its shape to be a circle, to do that, type food.shape(“circle”) then press enter key.
- For our snake food, we want its color to be red to ensure that it is easily seen by us on our snake game. Let’s go and type food.color(“red”) then press enter key.
Finalizing our snake food
Since our snake food is a turtle it will draw lines as it spawns randomly on our snake game window, to prevent this from happening, we must use the penup function. We would also want our snake food to spawn on a specific area within our game whenever we start the game.
- Let’s raise the pen of our snake food by typing food.penup() then press the enter key.
- To set a default spawn point for our snake food let’s type food.goto(0, 100) then press the enter key.
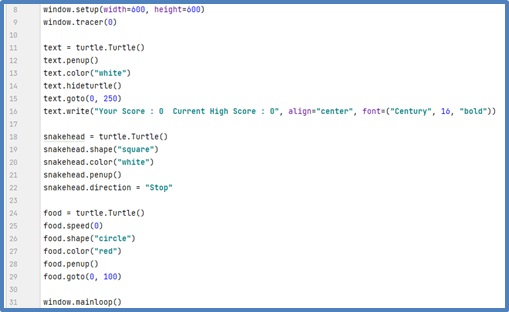
Step 6
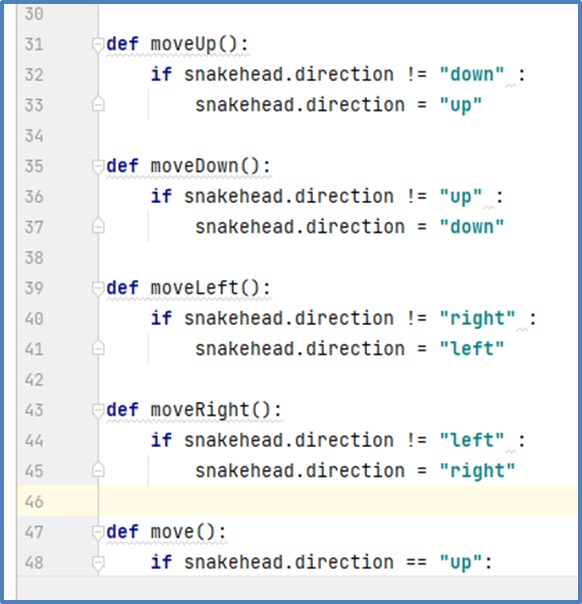
To make our snakehead move, we must provide the functions it will need. These functions are moveUp, moveDown, moveLeft, and moveRight.
Let’s Define the functions and provide the code that changes the direction of our snakehead. To move our snakehead up we need to create the function moveUp.
- Let’s type on our source code, def moveUp(): then press the enter key.
- Afterward, we’ll add a conditional statement that restricts the snakehead from going up if its current direction is down. To do this type, if snakehead.direction != "down": then press the enter key.
- If our snakehead is not heading down, our snakehead can go up, type snakehead.direction = "up" then press the enter key.
To move our snakehead down we need to create the function moveDown.
- Let’s type on our source code, def moveDown(): then press the enter key.
- Afterward, we’ll add a conditional statement that restricts the snakehead from going down if its current direction is up. To do this type, if snakehead.direction != "up": then press the enter key.
- If our snakehead is not heading up, our snakehead can go up, type snakehead.direction = "down" then press the enter key.
To move our snakehead left we need to create the function moveLeft.
- Let’s type on our source code, def moveLeft(): then press the enter key.
- Afterward, we’ll add a conditional statement that restricts the snakehead from going left if its current direction is right. To do this type, if snakehead.direction != "right": then press the enter key.
- If our snakehead is not heading right, our snakehead can turn left, type snakehead.direction = "left" then press the enter key.
To move our snakehead right we need to create the function moveRight.
- Let’s type on our source code, def moveRight(): then press the enter key.
- Afterward, we’ll add a conditional statement that restricts the snakehead from going right if its current direction is left. To do this type, if snakehead.direction != "left": then press the enter key.
- If our snakehead is not heading up, our snakehead can go up, type snakehead.direction = "right" then press the enter key.
Step 7
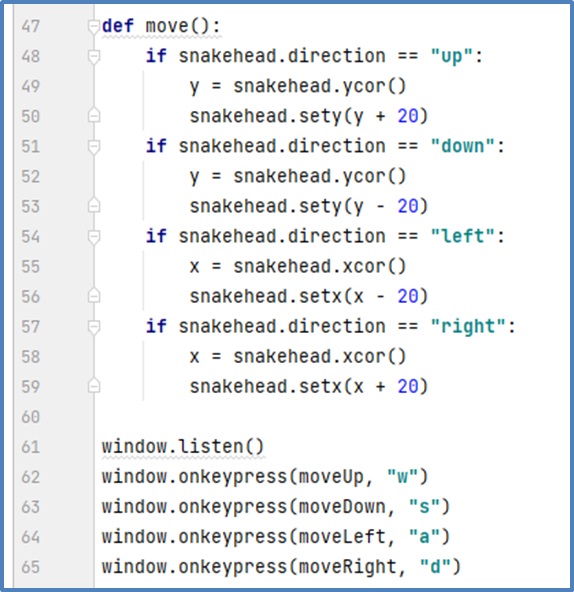
The move functions allow the snakehead to a particular direction while the onkeypress checks your keyboard presses that are used to define the direction our snakehead is going to take.
Let’s Define the function move.
Let’s type on our source code, def move(): then press the enter key. After defining the function move, let’s add the conditional statements that direct our turtle in that direction.
Adding the first if-condition for direction == “up” If our snakehead’s direction is told to go up, we take the current y value of our snakehead, then set our snakehead to move up by using the sety() function.
Let’s type the following on our source code.
if snakehead.direction == "up":
  y = snakehead.ycor()
  snakehead.sety(y + 20)
Adding the first if-condition for direction == “down” If our snakehead’s direction is told to go down, we take the current y value of our snakehead, then set our snakehead to move down by using the sety() function.
Let’s type the following on our source code.
if snakehead.direction == "down":
  y = snakehead.ycor()
  snakehead.sety(y - 20)
Adding the first if-condition for direction == “left” If our snakehead’s direction is told to go left, we take the current x value of our snakehead, then set our snakehead to turn left by using the setx() function.
Let’s type the following on our source code.
if snakehead.direction == "left":
  x = snakehead.xcor()
  snakehead.sety(x - 20)
Adding the first if-condition for direction == “right” If our snakehead’s direction is told to go right, we take the current x value of our snakehead, then set our snakehead to turn right by using the setx() function.
Let’s type the following on our source code.
if snakehead.direction == "right":
  x = snakehead.xcor()
  snakehead.sety(x + 20)
Now to add the listen and onkeypress functions.
These functions allow the program to take inputs from us, it is then used to change the snakehead’s directions on our game. We’ll first add the listen function on our window so that the program may respond to our key presses accordingly.
Adding the listen function
Let’s type window.listen() then press the enter key.
Adding the onkeypress functions on our window
- Let’s add the onkeypress for up by typing window.onkeypress(moveUp, "w") then press the enter key.
- Let’s add the onkeypress for down by typing window.onkeypress(moveDown, "s") then press the enter key.
- Let’s add the onkeypress for left by typing window.onkeypress(moveLeft, "a") then press the enter key.
- Let’s add the onkeypress for right by typing window.onkeypress(moveRight, "d") then press the enter key.
Before proceeding let’s check the added source code in our Snake Game.
Added Directional Functions.
Added Move, Listen, and Onkeypress functions.
Step 8
We’ve almost finished preparing everything we’ll be needing for our snake game, let’s first add 2 variables that are important for our snake game before we proceed to the main gameplay of the snake game.
Initializing Segments.
As we all know our game revolves on feeding our snake with food and making sure it grows as it eats without colliding with its own body or beyond the window. We were able to add the snakehead and the food, let’s add another important variable for our game. The added length to our snake is called segments.
segments is a list, whenever our snakehead eats food it will add a segment into the segments list and will clear the list if the snakehead collides on itself or the boundary of our game window, so make sure that our snakehead doesn’t eat itself or hit the limits of our window to gain the best score.
To initialize the segments variable let’s type segments = [] then press the enter key.
Initializing Delay.
Our snake game executes the block of codes while the program is running, because of this, we have to add a delay on executions of these codes. The delay is the interval on running these blocks of codes as the game runs. Let’s go and initialize our delay variable.
To initialize the delay variable let’s type delay = 0.1 then press the enter key.
Initializing Score and High-score
These variables are important to our snake game as these variables are responsible for counting our score and high score as we play the game.
To initialize the delay variable let’s type score = 0 then press the enter key, for the high-score, type high_score = 0 then press the enter key.
Now that we have finished initializing the important variables for our snake game, on our next step we’ll be adding the source code for our snake game alongside the conditions that prevent the snakehead from colliding with itself or the edges of our Snake game window.
Step 9
With our snake game window all set, a scoreboard added, snakehead with directional functions and onkeypress listeners, food customized, segments and delay initialized, it’s now time for us to add the gameplay that uses it all to make our snake game. Take your time on following the instructions provided as the gameplay section of our snake game can be a bit complex, but do not worry as I will be providing brief explanations and instructions you can use to follow along. Now let’s go and code it.
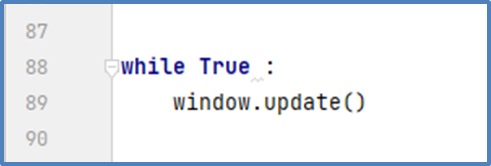
Our snake game will be running on a loop I have introduced to you on a previous topic, that would be the while loop. We will be using the while loop and add a Boolean true as a condition.
On your source code, type while True: then press the enter key.
This line of code means, that as long as we want to play the game, we can play it. The game will only stop once we click the x on the upper right of our snake game window.
Afterward, we’ll be adding an update function on our window. The update function allows the window to continuously update its content such as the movement of the snakehead, spawning of the food, and many more as we play the game.
Let’s type window.update() then press the enter key.
Step 10
Our snakehead hitting the edges of our game window is one of the things we don’t want for our snake game. We’ll be adding the conditional statement for it and if our snake hits the edges the score is returned to 0, we’ll reset the position of our snakehead and clear all segments added to our snakehead.
- Let’s add the conditional statement that checks if our snakehead hit the edges of our snake game window. We’ll type if head.xcor() > 290 or head.xcor() < -290 or head.ycor() > 290 or head.ycor() < -290 : then press the enter key.
- Now for us to add the sleep function that pauses the game screen whenever we hit the edges. The game is resumed once we press one of the directional controls to play again. Let’s type time.sleep(1) then press the enter key.
- To reset the position of our snake after hitting the edges of our window, simply type snakehead.goto(0, 0) then press the enter key.
- We also want our snake to stop moving until we told it so, let’s type snakehead.direction = "Stop" then press the enter key.
- Since our snakehead hit the edges of the game window, we should lose the segments added to our snake, to do this type for segment in segments: then press the enter key, then type segment.goto(1000, 1000) then press the enter key.
- We also need to clear our list of segments; this can be done easily by typing segments.clear() then press the enter key.
- We need to reset the score as well by turning its current value back to zero with score = 0 then press the enter key.
- Our scoreboard must be reset except for the high score, first we need to clear it by typing text.clear() then press the enter key, then type text.write("Your Score:{} Current High Score : {} ".format(score, high_score), align="center", font=("Century", 16, "bold")) then press the enter key.
Let’s check your source code.
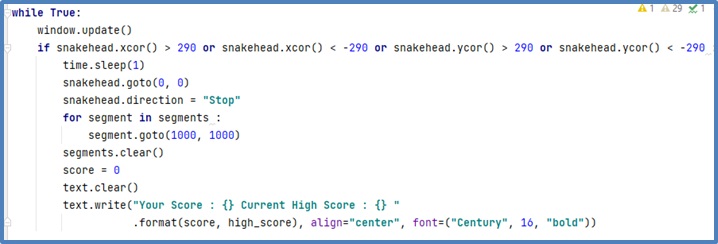
If our codes match one another congrats we can now proceed to the next parts of our snake game’s gameplay.
Step 11
For our snake to grow, our snakehead must eat the food the snake game spawns. In this step, we’ll be adding code that is responsible for spawning the food randomly on our snake game window.
Whenever our snakehead eats the food we have spawned, it randomly spawns another food in a random position, this is possible with the random library we have imported at the start.
- Let’s add the conditional statement for this function, type if snakehead.distance(food) < 20 : then press the enter key.
- Now for us to generate the random values of our x and y we’ll be typing x = random.randint(-270, 270) then press the enter key, for the y, type y = random.randint(-270, 270) then press the enter key.
- After generating the x and y values that we need to spawn our food let’s spawn the food by typing food.goto(x, y) then press the enter key.
In the next step, we’ll be adding the code responsible for adding segments whenever our snakehead manages to eat its food.
Step 12
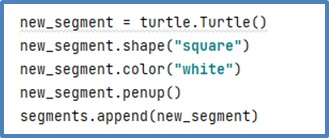
Whenever we manage to eat food, it should have a new segment added to our snake and an increase to our score. To add the following we’ll be creating another turtle and we will name it as new_segment.
Let’s declare a new variable new_segment and initialize it as a turtle, on your python source code, type, new_segment = turtle.Turtle() then press the enter key.
Customizing the added segment.
We will be changing the shape of our new_segment into a square so that it can fit our snakehead shape which is also a square. After changing the shape of our new_segment, we’ll also be changing the color of our segment to white to fit the snakehead’s color.
- To change the shape of our new_segment let’s use the shape function, on your source code, type new_segment.shape(“square”) then press the enter key.
- Change our new_segment color by using the color function, type new_segment.color("white") then press the enter key.
- Our new_segment will follow our snakehead as it is part of it, however, it will draw over our game screen because it is a turtle, to prevent this from happening we’ll use the penup function, simply type on our source code new_segment.penup() then press the enter key.
- Now that’s all done, let’s go and add our added segment on our segments list through segments.append(new_segment) then press the enter key.
Step 13
After adding a segment to our snake, the score on our game should also increase, alongside that we need to make sure that our scoreboard is updated whenever we increase the score. If we manage to beat our high score, the scoreboard should update the high score too.
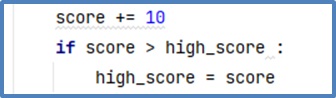
- Whenever our snake manages to eat food, we should raise the score, to do this let’s type score += 10 then press the enter key.
- Now let’s add the conditional statement that checks if we manage to beat the high score, type if score > high_score : then press the enter key.
- Let’s update the high score if we manage to beat it, after pressing the enter key, type high_score = score then press the enter key.
- Let’s update the scoreboard by first clearing it, type text.clear() then press the enter key.
- After clearing the scoreboard, we then add a new one with an updated score and high score, simply type text.write("Your Score : {} Current High Score : {} ".format(score, high_score), align="center", font=("Century", 16, "bold")) then press the enter key.

Step 14
Now that we manage to add the segments on our snakehead and even add a real-time scoring on our scoreboard, it’s time for us to add the function that allows our segments to follow our snakehead. The segments create are not connected to our snakehead, to do this we must tell these segments to follow our snakehead.
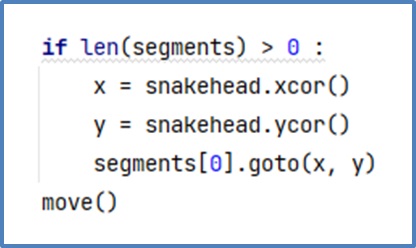
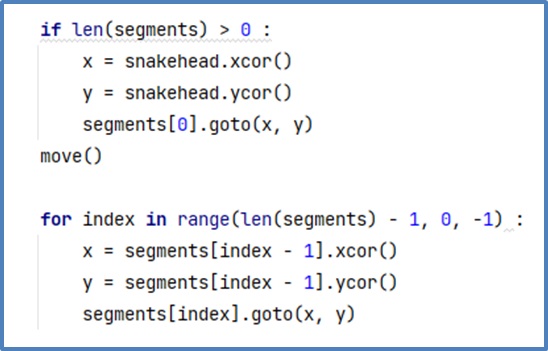
- Let’s add the conditional statement that checks if we have a segment added on our snakehead by checking if there is a segment on our segments list. In your source code, type if len(segments) > 0 : then press the enter key.
- After adding the conditional statement, we then copy the x and y value of our snakehead that allows the segment to follow our snakehead. To get the x value of our snakehead type, x = snakehead.xcor() then press the enter key, for the y value type y = snakehead.ycor() then press the enter key.
- Using the x and y values we can direct our segment to go to the position of our snakehead, let’s type segments[0].goto(x, y) then press the enter key.
- Afterward, we want our program to take another input from us the players to move our snakehead, simply type move() then press the enter key.
- With our first segment following the snakehead, we want to make the rest of the segments follow the snakehead. To make the rest of the segments follow the snakehead we add a loop to get all of the segments to follow the snakehead, let’s type for index in range(len(segments) - 1, 0, -1) : then press the enter key.
- With a loop that gets all of the segments, we want each segment to follow the previous segment to show the change in direction.
- Let’s get the x and y value of the previous segment, for the x value, type x = segments[index - 1].xcor() then press the enter key, for the y value, type y = segments[index - 1].ycor() then press the enter key.
- With the x and y values taken, we’ll be using the following to redirect the current segment to follow the previous segment with the code segments[index].goto(x, y) then press the enter key.
Woo, that was a lot, don’t worry we are close to finishing our game, we’ll be adding the body collision conditional statement that checks if our snakehead hits one of its segments.
Step 15
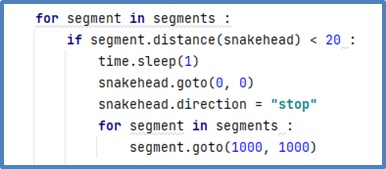
In our snake game, we don’t want our snakehead to collide with its own body, that’s why we’ll be adding a loop that checks all of the segments if they have collided with our snakehead.
- Let’s begin by making the loop that helps check for any collisions, let’s type for segment in segments : then press the enter key.
- After that, we’ll be adding the conditional statement that will check all segment for any collision with our snakehead, on your source code, type if segment.distance(snakehead) < 20 : then press the enter key.
- If our snakehead did hit one of our segments, we have to pause the game, let’s go on and type time.sleep(1) then press the enter key.
- With the snake game on pause, we will then reset the position of our snakehead back to the center, let’s type snakehead.goto(0, 0) then press the enter key to move our snakehead.
- To make sure that our snakehead stops moving not until we told it to, we’ll be telling our snakehead to stop moving. On our source code, let us type, snakehead.direction = "stop" then press the enter key.
- After stopping the movement of our snakehead, we have to remove all of the added segments on our snake since our snakehead collided with its own body, to do this we’ll be adding a loop that moves all our segments outside the window. For the loop let’s type for segment in segments : then press the enter key, after that let’s type segment.goto(1000, 1000) then press the enter key to move those segments out.
Step 16
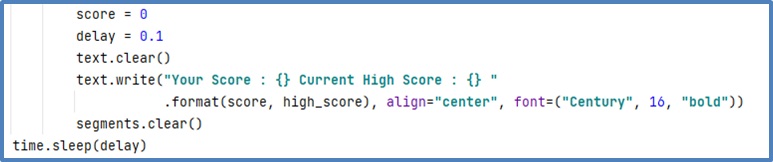
We need to reset the score back to zero if our snakehead did make a collision with its own body. We will also be resetting the scoreboard and update the score to zero. Once we're done with the scoreboard; we need to clear all our segments on our segments list.
- To reset the score back to zero, let’s type score = 0 then press the enter key.
- We need to add a small delay for our game before we can restart the game, let’s add the delay by typing delay = 0.1 then press the enter key.
- Let’s update the scoreboard by first clearing it, type text.clear() then press the enter key.
- After clearing the scoreboard, we then add a new one with an updated score and high score, simply type text.write("Your Score : {} Current High Score : {} ".format(score, high_score), align="center", font=("Century", 16, "bold")) then press the enter key.
- We also need to clear our list of segments; this can be done easily by typing segments.clear() then press the enter key.
- To finish our snake game, let’s add the delay we have added to our sleep function by typing time.sleep(delay) then press the enter key.
Congratulations, we manage to make our own snake game, now let’s try running our snake game to test it out.
Step 17
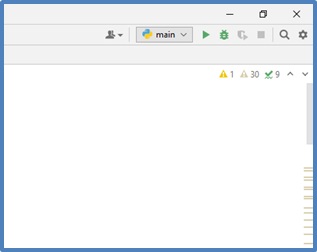
On the upper right of our source code, we can see a play button, press the button so that we can run and test our snake game.
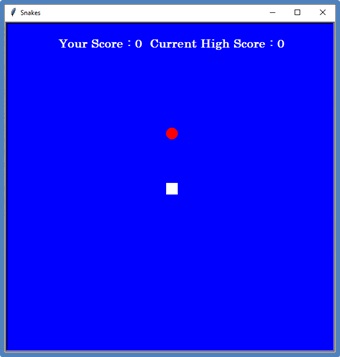
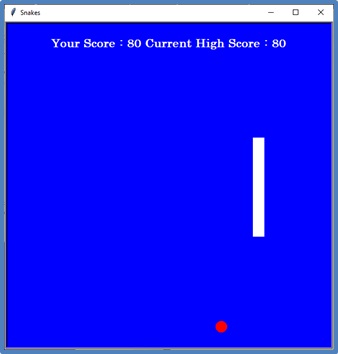
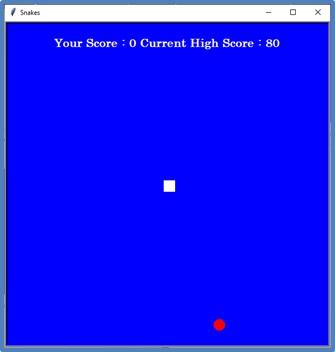
Now that we were able to make our own snake game, I’ll be providing here the source code for those who had difficulties. Feel free to edit the source code if you want to change the appearance of any of our components on our snake game.
Source Code:
# Libraries we'll be needing
import turtle
import time
import random

# Creating the Window for our snake game
window = turtle.Screen()
window.title("Snakes")
window.bgcolor("blue")
window.setup(width=600, height=600)
window.tracer(0)

# Creating the scoreboard for our snake game
text = turtle.Turtle()
text.penup()
text.color("white")
text.hideturtle()
text.goto(0, 250)
text.write("Your Score : 0  Current High Score : 0", align="center", font=("Century", 16, "bold"))

# Creating the snakehead for our snake game
snakehead = turtle.Turtle()
snakehead.shape("square")
snakehead.color("white")
snakehead.penup()
snakehead.direction = "Stop"


# Creating the food for our snake game
food = turtle.Turtle()
food.speed(0)
food.shape("circle")
food.color("red")
food.penup()
food.goto(0, 100)

# Assigning directions our snakehead may take
def moveUp():
    if snakehead.direction != "down" :
        snakehead.direction = "up"

def moveDown():
    if snakehead.direction != "up" :
        snakehead.direction = "down"

def moveLeft():
    if snakehead.direction != "right" :
        snakehead.direction = "left"

def moveRight():
    if snakehead.direction != "left" :
        snakehead.direction = "right"

# Creation of Method Move
def move():
    if snakehead.direction == "up":
        y = snakehead.ycor()
        snakehead.sety(y + 20)
    if snakehead.direction == "down":
        y = snakehead.ycor()
        snakehead.sety(y - 20)
    if snakehead.direction == "left":
        x = snakehead.xcor()
        snakehead.setx(x - 20)
    if snakehead.direction == "right":
        x = snakehead.xcor()
        snakehead.setx(x + 20)

# Getting onkeypresses from the players
window.listen()
window.onkeypress(moveUp, "w")
window.onkeypress(moveDown, "s")
window.onkeypress(moveLeft, "a")
window.onkeypress(moveRight, "d")

# Adding the delay of executions
delay = 0.1

# Initialization of the segments list
segments = []

# Initialization of the high_score and score
high_score = 0
score = 0

# Our snake game's main gameplay
while True:
    window.update()

    # Checking for any snakehead to window edges collision
    if snakehead.xcor() > 290 or snakehead.xcor() < -290 or snakehead.ycor() > 290 or snakehead.ycor() < -290 :
        time.sleep(1)
        snakehead.goto(0, 0)
        snakehead.direction = "Stop"
        for segment in segments :
            segment.goto(1000, 1000)
        segments.clear()
        score = 0
        text.clear()
        text.write("Your Score : {} Current High Score : {} "
                   .format(score, high_score), align="center", font=("Century", 16, "bold"))

    # Checking if our snakehead is at the food
    if snakehead.distance(food) < 20 :
        x = random.randint(-270, 270)
        y = random.randint(-270, 270)
        food.goto(x, y)

        # Addition of segments
        new_segment = turtle.Turtle()
        new_segment.shape("square")
        new_segment.color("white")
        new_segment.penup()
        segments.append(new_segment)

        # Increasing the score and high_score update
        score += 10
        if score > high_score :
            high_score = score
        text.clear()
        text.write("Your Score : {} Current High Score : {} "
                   .format(score, high_score), align="center", font=("Century", 16, "bold"))

    # First segment following the snakehead
    if len(segments) > 0 :
        x = snakehead.xcor()
        y = snakehead.ycor()
        segments[0].goto(x, y)
    move()

    # The rest of the segments following the snakehead
    for index in range(len(segments) - 1, 0, -1) :
        x = segments[index - 1].xcor()
        y = segments[index - 1].ycor()
        segments[index].goto(x, y)


    # Checking for any snakehead to body collisions
    for segment in segments :
        if segment.distance(snakehead) < 20 :
            time.sleep(1)
            snakehead.goto(0, 0)
            snakehead.direction = "stop"
            for segment in segments :
                segment.goto(1000, 1000)

            # Resetting of score and scoreboard
            score = 0
            delay = 0.1
            text.clear()
            text.write("Your Score : {} Current High Score : {} "
                       .format(score, high_score), align="center", font=("Century", 16, "bold"))

            # Clears all segments
            segments.clear()

    time.sleep(delay)

window.mainloop()
turtle.exitonclick()
Congratulations again on finishing our module on Turtle Programming, I hope that you’ll be able to create unique projects with all of the functions discussed in this module. Always remember that programming is a matter of trial and error, it is also a matter of continuous practice, devote yourself to coding and you’ll be able to create applications that can help change the world.